Decoratorの導入
Decoratorについて
Decoratorとはソフトウェアのデザインパターンのひとつであり、モデルとviewの間に追加する。
「モデル→Decorator→view」のようにviewを装飾するメソッドを追加するときはモデルではなく、デコレーターへ追加する。
Decoratorを導入すればviewにロジックを記述しないことができる。そうすることで、
モデルにはデータベース関連の処理のみを記載し、モデルの肥大化を防ぐことができる。
gem Draper
railsでデコレーター層(プレゼンテーション層)を導入するにはDraperかActive_Decoratorを使用するのが一般的である。
今回はDraperを利用しデコレーター層を導入する。
導入
gem 'Draper' とGemfile記述しbundle installする。bundle後、
$ rails g draper:install
create  app/decorators/application_decorator.rb
を実行。これでインストールが完了しジェネレーターコマンドが使えるようになる。
UserモデルのDecoratorを生成する。「rails g decorator (モデル名)」
$ rails g decorator User
create  app/decorators/user_decorator.rb
appにdecoratorsディレクトリとuser_decorator.rbが作成される。
Decorator内にメソッドを追加
class UserDecorator < Draper::Decorator
  delegate_all
  def full_name
    "#{last_name} #{first_name}"
  end
end
delegate_allという記述はUserモデルすべてのメソッドを呼び出せるようにし、UserDecoratorクラスでも使えるようにしている。
これがあることで、Userモデルが所有するメソッド(last_name,first_name)を定義したfull_nameメソッドで使うことができる。
view側でdecoratorメソッドを呼び出す。
<%= current_user.decorate.full_name %>
反映にはサーバーの再起動が必要。
Bootstrapでflashメッセージを実装
概要
以下のflashメッセージをbootstrapで表示させる。
- ログイン成功時・・・「ログインしました」
- ログイン失敗時・・・「ログインに失敗しました」
- ログアウト時・・・「ログアウトしました」
- ユーザー登録時・・・「ユーザー登録が完了しました」
- ユーザー登録失敗時・・・「ユーザー登録に失敗しました」
定義の追加
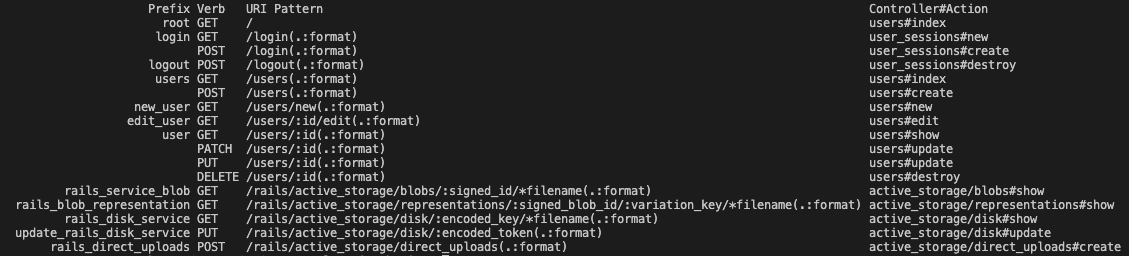
flashオブジェクトはハッシュ形式で保存されており、viewにメッセージを表示している。デフォルトではnoticeとalertキーしかない。bootstrapを使用する場合、下図のようなキーが使用できる。

これらのキーを使用するにはキーを許可する宣言をしなければならない。
application_controller.rbに以下の記述をする。
add_flash_types :success, :info, :warning, :danger
すると、success, :info, :warning, :dangerのキーが使用可能になる。
flashメッセージの表示をviewに追加
flashメッセージは複数のviewで使用するのでパーシャルを使う。
_flash_message.html.erbを作成しapplication_controllerで読み込む。
<% flash.each do |key, value| %>
  <div class="alert alert-<%= key %>"><%= value %></div>
<% end %>
keyとvalueはコントローラーから指定する。
例1
redirect_back_or_to root_path, success: 'ログインしました'
「success」がkeyで「ログインしました」はvalueで取得される。
例2
flash.now[:danger] = 'ログインに失敗しました'
「danger」がkeyで「ログインに失敗しました」がvalue
flashとflash.nowの違い
flash[:danger]の場合は次のアクションまでメッセージを表示させる。 flash.now[:danger]とすると、次のアクションに遷移した時点でメッセージが消える。
パーシャルを読み込む
#...
   <body>
   <% if logged_in? %>
     <%= render 'shared/header'%>
   <% else %>
     <%= render 'shared/before_login_header'%>
   <% end %>
     <%= render 'shared/flash_message'%>
   <%= yield %>
     <%= render 'shared/footer'%>
  </body>
</html>
ログイン・ログアウト時にflashメッセージを表示させる
ログイン成功、ログアウト時はsuccessキーで表示。 ログイン失敗時はdangerキーで表示させる。
class UserSessionsController < ApplicationController
  skip_before_action :require_login, only: %i[create new]
  def new; end

  def create
    @user = login(params[:email], params[:password])

    if @user
      redirect_back_or_to root_path, success: 'ログインしました'
    else
      flash.now[:danger] = 'ログインに失敗しました'
      render :new
    end
  end

  def destroy
    logout
    redirect_to root_path, danger: 'ログアウトしました'
  end
end
renderとredirect_toの違い
上記を例とすると、
ログインできた場合
users#createアクション→root_path(users#index)→index.html.erbが描画される。
ログインに失敗した場合
users#createアクション→new.html.erbが描画される。という処理が流れる。
この処理から、redirect_to は、view の表示には直接は関係なく、新たな HTTPリクエストが発行される。*GETのみ(下図参照)
renderはcreateアクションに指定した値を直接表示させることがわかる。

ユーザー登録時にflashメッセージを表示させる。
ユーザー登録に成功したときと失敗したときに、メッセージを表示させる。
#...
  def create
    @user = User.new(user_params)
    if @user.save
      redirect_to login_path, success: 'ユーザー登録が完了しました'
    else
      flash.now[:danger] = 'ユーザー登録に失敗しました'
      render :new
    end
  end
#...
追記
ログイン前のヘッダーにあるログインボタンのhttpリクエストをgetにする。 ここがpostとかになっているとヘッダーのログインボタンからログインページにいったときにflashメッセージが表示されてしまう。
<%= link_to 'ログインする', login_path, method: :get, class: 'nav-link' %>
link_toメソッド
Railsでは主にviewファイルで使用され、引数を指定することでリンクを生成する。 <%= link_to 'リンクの文言', 'パス', class: 'クラス名', method: :HTTPリクエスト %>
methodでリンク先のルーティングを指定できる。
i18nによる日本語化
i18nを使用しユーザー登録画面とログイン画面を日本語化する。
i18n国際化(Internationalization)はRailsにおいて、言語の翻訳機能があるgemである。
実行環境
- Rails5.2.3
- Ruby2.6.4
gem 'rails-i18n'をGemfileに記述し、bundleする。
# rails5系なら以下を記述
gem 'rails-i18n', '~> 5.1'

# rails4系なら以下を記述
gem 'rails-i18n', '~> 4.0'
config/application.rbにデフォルトの言語を日本語にする設定とロケールファイルを読み込むPATHを設定。
config.i18n.default_locale = :ja

config.i18n.load_path += Dir[Rails.root.join('config', 'locales', '**', '*.{rb,yml}').to_s]
config/locales以下にロケールファイルを作成する。
モデル名、モデル属性に関する日本語化はactiverecord/ja.ymlに記述。
ビューに関する日本語化はviews/ja.ymlに記述。
モデル側の日本語化
モデルは全て activerecord 以下に記述する。 models以下に日本語化するモデルを指定、attributes以下にはモデルの属性を指定する。
ユーザー登録画面 modelに関する翻訳ファイル
ja:
 activerecord:
   models:
    user: 'ユーザー'
   attributes:
     user:
       last_name: '姓'
       first_name: '名'
       email: 'メールアドレス'
       password: 'パスワード'
       password_confirmation: 'パスワード確認'
Modelに紐づくform_withのlabelはRailsがロケートファイルの翻訳を適応してくれる。 一方でform_withの引数にModelを渡してないときはモデルと紐付いていないので、label自身に翻訳を適応する記述をする必要がある。また、国際化の際はlazy lookup機能を使用する。
     <%= form_with model:@user, local: true do |f| %>
        <div class="form-group">
          <%= f.label :last_name %>
          <%= f.text_field :last_name, class: 'form-control', id: 'user_last_name' %>
        </div>
        <div class="form-group">
          <%= f.label :first_name %>
          <%= f.text_field :first_name, class: 'form-control', id: 'user_first_name' %>
        </div>
        <div class="form-group">
          <%= f.label :email %>
          <%= f.text_field :email, class: 'form-control', id: 'user_email' %>
        </div>
        <div class="form-group">
          <%= f.label :password %>
          <%= f.password_field :password, class: 'form-control', id: 'user_password' %>
        </div>
        <div class="form-group">
          <%= f.label :password_confirmation %>
          <%= f.password_field :password_confirmation, class: 'form-control', id: 'user_password_confirmation' %>
        </div>
        <%= f.submit (t 'defaults.register'), class: 'btn btn-primary'%>
        <%end%>
      <div class='text-center'>
      <%= link_to (t 'defaults.to_login_page'), login_path%>
view側の日本語化
ログイン画面 viewに関する翻訳ファイル
ja:
  defaults:
    login: 'ログイン'
    register: '登録'
    title: 'ユーザー登録'
    to_login_page: 'ログインページへ'
  user_sessions:
     new:
       Back: '戻る'
       title: 'ログイン'
       email: 'メールアドレス'
       password: 'パスワード'
       to_register_page: '登録ページへ'
ログイン画面はform_withの引数がurlでモデルと紐付いていないのでlabelに翻訳を適応させる記述をする。 Model.human_attribute_name(:カラム名)で属性名を取得する。
<%= link_to (t '.Back'), users_path %>
<div class="container">
 <div class="row">
   <div class=" col-md-10 offset-md-1 col-lg-8 offset-lg-2">
     <h1><%= t '.title' %></h1>
     <%= form_with url: login_path, local: true do |f| %>
       <div class="form-group">
         <%= f.label :email, User.human_attribute_name(:email) %>
         <%= f.text_field :email, class: "form-control" %>
       </div>
       <div class="form-group">
         <%= f.label :password, User.human_attribute_name(:password) %>
         <%= f.password_field :password, class:"form-control" %>
       </div>
       <div class="actions">
         <%= f.submit (t 'defaults.login'), class: "btn btn-primary" %>
       </div>
     <% end %>
     <div class='text-center'>
       <%= link_to (t '.to_register_page'), new_user_path %>
gem sorceryを使用し、ユーザー登録、ログイン機能を実装
概要
sorceryとは、railsで作成されたアプリケーションに対し、ログイン機能を実装させるgem。
認証用gemであるdeviseと比較すると、sorceryはある程度のコードは自分で書かなければいけなく、deviseよりコードを書く量が多いがその分カスタマイズ性があり、エラーが発生したときなど自分で書いたコードなのでエラーの特定がしやすい。
導入
sorcery wikiを参考にし、gemの導入からユーザー登録、ログイン、ログアウト機能を実装する。
実行環境
まずは、Gemfileにgem 'sorcery'を追加し、bundle installする。
gem 'sorcery'
sorceryによって追加されたジェネレータを実行しrails db:migrateすると、 userモデルとマイグレーションファイルが作成され、rails db:migrateによりusersテーブルが作成される。
$ rails g sorcery:install
      create  config/initializers/sorcery.rb
    generate  model User --skip-migration
      invoke  active_record
      create    app/models/user.rb
      insert  app/models/user.rb
      insert  app/models/user.rb
      create  db/migrate/20210429103839_sorcery_core.rb

$rails db:migrate
== 20210429103839 SorceryCore: migrating ======================================
-- create_table(:users)
   -> 0.0016s
-- add_index(:users, :email, {:unique=>true})
   -> 0.0006s
== 20210429103839 SorceryCore: migrated (0.0024s) =============================
今回は、ユーザ登録に姓名、email、password、password confirmationを入力できるようにしたいので、データベースにlast_name、first_nameカラムをstring型で追加する。
$ rails g migration AddLastNameToUsers last_name:string
#マイグレーションファイルを編集
  def change
    add_column :users, :last_name, :string
  end
rails db:migrate  #first_nameも同様に作成する。
SQLで作成されているか確認。
sqlite> PRAGMA TABLE_INFO(users);
0|id|integer|1||1
1|email|varchar|1||0
2|crypted_password|varchar|0|NULL|0
3|salt|varchar|0|NULL|0
4|created_at|datetime|1||0
5|updated_at|datetime|1||0
6|last_name|varchar|0||0
7|first_name|varchar|0||0
ユーザーの作成
ジェネレータを使用し、usersコントローラとビューの作成。
$rails g scaffold_controller user email:string crypted_password:string salt:string
     create  app/controllers/users_controller.rb
      invoke  erb
      create    app/views/users
      create    app/views/users/index.html.erb
      create    app/views/users/edit.html.erb
      create    app/views/users/show.html.erb
      create    app/views/users/new.html.erb
      create    app/views/users/_form.html.erb
viewの作成
form_withについて
form_withとは、モデルオブジェクトを使ってhtmlのフォームを作成するためのヘルパーメソッドである。 form_withにはmodel:とurl:オプションがあり使い分ける必要がある。 入力された情報がデータベースへ保存しない(モデルとフォームが紐付かない)場合はurl:オプションを使う。
<%= form_with url: "パス" do |form| %>
<% end %>
データベースへ保存するときは、model:オプションを使う。
<%= form_with model: モデルクラスのインスタンス do |form| %>
<% end %>
今回は、新規登録内容をデータベースへ保存する必要があるのでmodel:オプションを使用する。form_withにmodel: @userという引数を渡すことで、モデルとフォームを対応づける。また、form_withはデフォルトでajax通信になるのでlocal: trueをつける。
<div class="container">
  <div class="row">
    <div class="col-md-10 offset-md-1 col-lg-8 offset-lg-2">
      <h1>ユーザー登録</h1>
      <%= form_with model:@user, local: true do |f| %>
        <div class="form-group">
          <%= f.label :last_name %>
          <%= f.text_field :last_name, class: 'form-control', id: 'user_last_name' %>
        </div>
        <div class="form-group">
          <%= f.label :first_name %>
          <%= f.text_field :first_name, class: 'form-control', id: 'user_first_name' %>
        </div>
        <div class="form-group">
          <%= f.label :email %>
          <%= f.text_field :email, class: 'form-control', id: 'user_email' %>
        </div>
        <div class="form-group">
          <%= f.label :password %>
          <%= f.password_field :password, class: 'form-control', id: 'user_password' %>
        </div>
        <div class="form-group">
          <%= f.label :password_confirmation %>
          <%= f.password_field :password_confirmation, class: 'form-control', id: 'user_password_confirmation' %>
        </div>
        <%= f.submit '登録する', class: 'btn btn-primary'%>
        <%end%>
      <div class='text-center'>
      <%= link_to 'ログインページへ', login_path%>
      </div>
    </div>
  </div>
</div>
ログイン状態に応じてヘッダー表示を切り替える。
logged_in?メソッドを使用する。 ログイン前はログインボタン、ログイン後は一覧やログアウトボタンを表示するようになる。
#...
   <body>
   <% if logged_in? %>
     <%= render 'shared/header'%>
   <% else %>
     <%= render 'shared/before_login_header'%>
   <% end %>
   <%= yield %>
   <%= render 'shared/footer'%>
  </body>
</html>
_form.html.erbにパスワードを保持する仮想フィールドを追加
<div class="field">
   <%= form.label :password %><br />
   <%= form.password_field :password %>
</div>
<div class="field">
   <%= form.label :password_confirmation %><br />
   <%= form.password_field :password_confirmation %>
</div>
controllerの作成
ユーザー登録後はログイン画面へリダイレクトするようにし、ストロングパラメータでは、last_name,first_name,password,password_confirmationを受け取れるようにする。
ストロングパラメータについて
Rails4から導入された「Mass-assignment」という脆弱性へのセキュリティ対策である。テーブルに登録されるすべてのデータはストロングパラメータによる検証をクリアしなければ登録できなくなっている。例えば、@user =User.new(user_params)を(params[:user])に変更して実行すると「ActiveModel::ForbiddenAttributesError 」という例外が発生してしまう。user_paramsメソッドに記載されたコードは「paramsが:userというキーを持っていて、かつparams[:user]が、:email, :last_name, :first_name, :password, :password_confirmation, :crypted_password, :saltというキーを持つハッシュである」ことを確認し、登録できるカラムを特定し、それ以外のカラムへのアクセスを禁止している。よって、許可されたカラムしか登録、更新ができなくなる。
class UsersController < ApplicationController
  before_action :set_user, only: %i[show edit update destroy]
  skip_before_action :require_login, only: %i[new create index]
#...
  def new
    @user = User.new
#インスタンス変数にuser#newアクションからviewに渡したいデータを入れる
  end

  def create
    @user = User.new(user_params)
#user#createアクションで@userにuser_paramsに入ったデータを代入。
    if @user.save #データを保存
      redirect_to login_path, notice: 'success'
#login_path ヘルパーメソッドを使用。保存が成功したらログインページへ
    else
      render :new #保存が失敗したら登録画面へ
    end
  end
#...

  private

  def set_user
    @user = User.find(params[:id])
  end

  def user_params
    params.require(:user).permit(:email, :last_name, :first_name, :password, :password_confirmation, :crypted_password, :salt)
  end
end
Modelの作成
モデルファイルにバリデーションを設定する。authenticates_with_sorcery!はuserモデルにsorceryによる認証機能をもたせている。 passwordとpassword_confirmationはuserモデルのカラムには存在しない。crypted_passwordカラムの仮想属性である。sorceryによってcrypted_passwordカラムの内容であると認識される。
class User < ApplicationRecord
  authenticates_with_sorcery!
  validates :password, length: { minimum: 3 }, if: -> { new_record? || changes[:crypted_password] }
  validates :password, confirmation: true, if: -> { new_record? || changes[:crypted_password] }
#ここでcrypted_passwordとして認識される。
  validates :password_confirmation, presence: true, if: -> { new_record? || changes[:crypted_password] }
  validates :email, presence: true, uniqueness: true
  validates :last_name, presence: true, length: { maximum: 250 }
  validates :first_name, presence: true, length: { maximum: 250 }
end
ログイン、ログアウト機能の実装
ジェネレータでuser_sessions_controllerを作成する。
$ rails g controller UserSessions new create destroy
      create  app/controllers/user_sessions_controller.rb
      invoke  erb
      create    app/views/user_sessions
      create    app/views/user_sessions/new.html.erb
      create    app/views/user_sessions/create.html.erb
      create    app/views/user_sessions/destroy.html.erb
Routerを定義する。
ルーティングを以下のように定義。
Rails.application.routes.draw do
  root to: 'users#index'
  get '/login', to: 'user_sessions#new', as: :login
  post '/login', to: 'user_sessions#create'
  post '/logout', to: 'user_sessions#destroy', as: :logout
  resources :users
end
controllerの作成
redirect_back_or_toメソッドはsorceryでフレンドリーフォーワーディングを実現するための機能である。 ログインが必要なページに未ログイン状態でアクセスした場合、ログイン画面に遷移させてログイン後はログインが必要なページへ飛ばす。
class UserSessionsController < ApplicationController
  skip_before_action :require_login, only: %i[new create]
  def new; end

  def create
    @user = login(params[:email], params[:password])
#emailによるユーザ検索、passwordの検証を行いUserレコードのid値をセッションに格納。
    if @user
      redirect_back_or_to root_path, notice: 'Login successful!!!'
#ログイン後はトップページへリダイレクト
    else
      flash.now[:alert] = 'Login failed'
      render action: 'new'
    end
  end

  def destroy
    logout
    redirect_to(root_path, notice: 'Logged out!')
#ログアウト後トップページへリダイレクト
  end
end
セッションviewの作成
ログインフォームはモデルと紐付かないので、form_withのオプションはurl:を使用する。フォーム送信先は/loginなのでlogin_pathとする。
<%= link_to 'Back', users_path %>
<div class="container">
 <div class="row">
   <div class=" col-md-10 offset-md-1 col-lg-8 offset-lg-2">
     <h1>ログイン</h1>
     <%= form_with url: login_path, local: true do |f| %>
       <div class="form-group">
         <%= f.label :email %>
         <%= f.text_field :email, class: "form-control" %>
       </div>
       <div class="form-group">
         <%= f.label :password %>
         <%= f.password_field :password, class:"form-control" %>
       </div>
       <div class="actions">
         <%= f.submit "ログイン", class: "btn btn-primary" %>
       </div>
     <% end %>
     <div class='text-center'>
       <%= link_to '登録ページへ', new_user_path %>
     </div>
   </div>
 </div>
</div>
これでユーザー登録、ログイン・ログアウト機能の完成。
テストバグ修正
環境
- rbenv local 2.6.6
- nodenv local 12.14.0
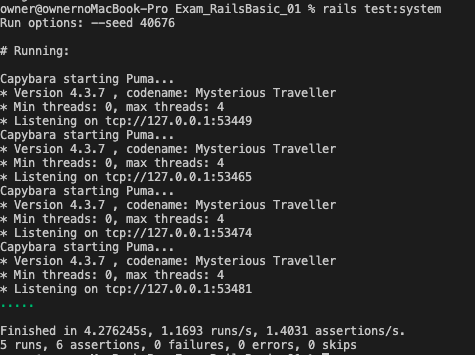
rails test:systemでテストを実行したところ
sign up success
login
logout
login faild not exist user
visit about pageができない
sign upは検証ツールで確かめると、viewからフォーム送信はできていることがわかる。
users_controller.rbのcreateアクションを確認しbinding.irbをいれたあとブラウザで再度パスワードを入力
def create
    @user = User.new(user_params)
    binding.irb
    if @user.save
      log_in @user
      flash[:success] = "成功"
      redirect_to @user
    else
      render :new
    end
  end
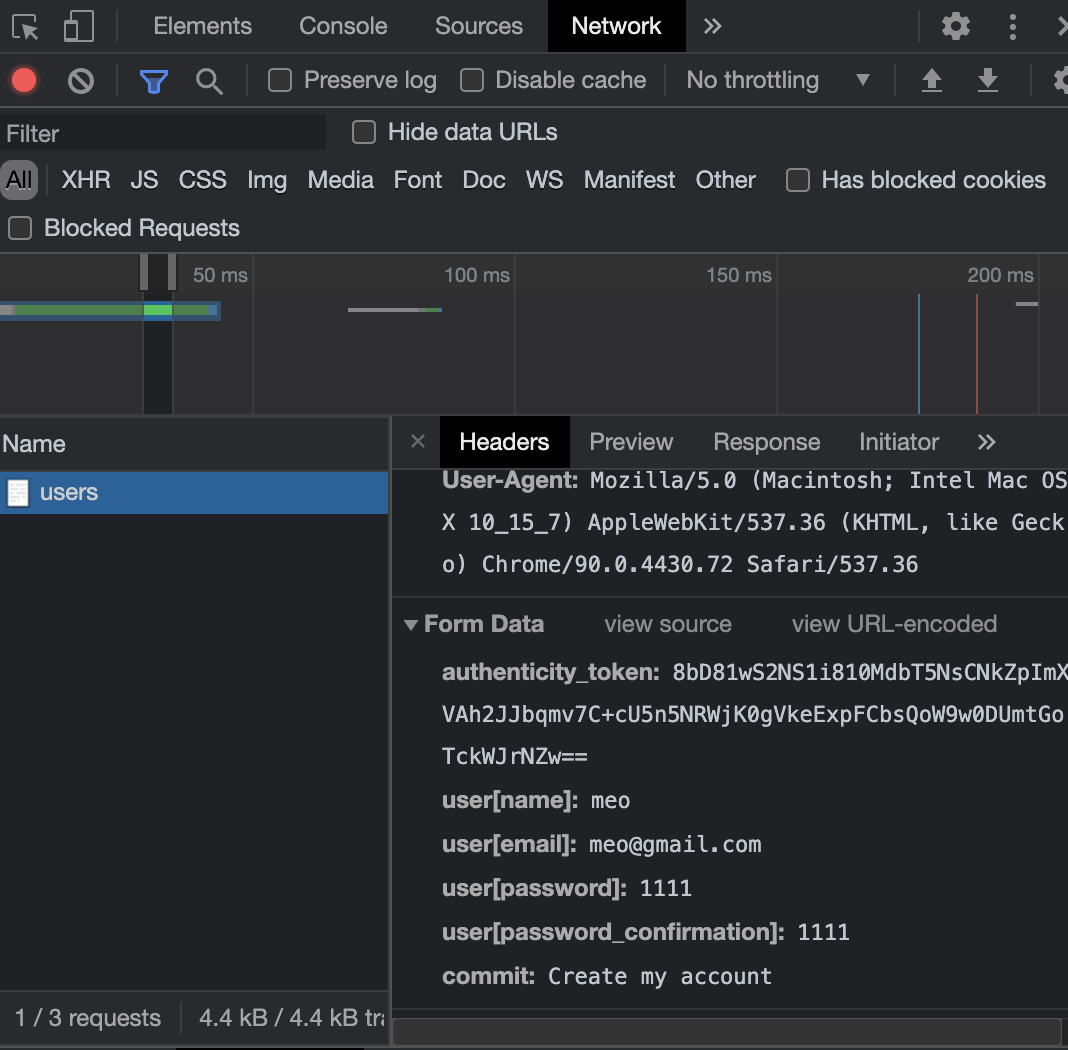
paramsで検証ツールでみたようにパスワードが送れてることが確認する。
irb(#<UsersController:0x00007fa315031c58>):001:0> params
=> <ActionController::Parameters {"authenticity_token"=>"dewo4jc5+wMJcaAOyaReiUi+UIiYyCTQe4rrq8Kg3HIYD03MBpptBSOXbOONtPckOTnX5d1SA/u6SZXhM5X9Og==", "user"=><ActionController::Parameters {"name"=>"meo", "email"=>"meo@gmail.com", "password"=>"1111", "password_confirmation"=>"1111"} permitted: false>, "commit"=>"Create my account", "controller"=>"users", "action"=>"create"} permitted: false>
@userが作れてるか確認するとpassword_digestがnilになっているので@user = User.new(user_params)が間違っている
irb(#<UsersController:0x00007fa315031c58>):002:0> @user
=> #<User id: nil, name: "meo", email: "meo@gmail.com", created_at: nil, updated_at: nil, password_digest: nil>

irb(#<UsersController:0x00007fa315031c58>):003:0>  @user = User.new(user_params)
Unpermitted parameter: :password
パスワードが許可されてないとでるのでuser_paramsをさらに確認するとusers_controller.rbのuser_paramsアクションにpasswordが抜けていることがわかる。
passwordを追加。
 def user_params
    params.require(:user).permit(:name, :email, :password,
                                 :password_confirmation)
  end
irbをexitで終了し再度ブラウザでPWを入力し@userを実行すると、[FILTERED]と表示されているので値がはいってることがわかる。
irb(#<UsersController:0x00007fa310d78510>):001:0> @user
=> #<User id: nil, name: "meo", email: "meo@gmail.com", created_at: nil, updated_at: nil, password_digest: [FILTERED]>
@user.valid?でバリデーションを通るか確認するとtrueになったのでうまくいっている。
irb(#<UsersController:0x00007fa3114c6bc8>):001:0> @user.valid?
  User Exists? (0.3ms)  SELECT 1 AS one FROM "users" WHERE "users"."email" = ? LIMIT ?  [["email", "meo@gmail.com"], ["LIMIT", 1]]
  ↳ (irb):1:in `create'
=> true
exitで終了するとCompleted 500 Internal Server Error in 30608ms (ActiveRecord: 3.2ms | Allocations: 67204)NoMethodError (undefined method `log_in' for #<UsersController:0x00007fa3114c6bc8> Did you mean? login_url):というエラーが出る。
これは新規作成はできたがlog_inというメソッドがないエラーであり、エディターでlog_inで検索するとsessions_helper.rbに書かれている。 ヘルパーはclass UsersController < ApplicationControllerのどちらかで読み込まれてることが多い application_controller.rbを見ると何も書かれていないので include SessionsHelperを追加しヘルパーを読み込ませる。 再度ブラウザから入力し@userとuser.valid?とlog_inをirbで通ることを確認してexitするとログインした状態になる。
binding.rbを削除しサーバーを再起動
メールアドレスとパスワードを入力しログインできることを確認してテストを実行rails test:system
 sign up successとlogin logoutは解決した。
login faild not exist user
存在しないユーザーでログインすると失敗する
emailとパスワードを適当にいれてログインすると以下のエラーになる。

authenticateメソッドはユーザーを認証するときのメソッドである
authenticateメソッドは定義されてないとでるので調べるとnilとでてくる
>>  user.authenticate(params[:session][:password])
NoMethodError: undefined method `authenticate' for nil:NilClass
    from /Users/owner/exam1/Exam_RailsBasic_01/app/controllers/sessions_controller.rb:6:in `create'
>> user
=> nil

>>  user = User.find_by(email: params[:session][:email].downcase)
=> nil

>> params[:session][:email].downcase
=> "admin@example.com"
find byメソッドは存在しない場合nilをかえす。nilに対してメソッドを実行しようとしているのでエラーになっている。 また、findメソッドの場合はactiverecord例外が発生して500エラーになる。 →ぼっち演算子を使う。 &.(ぼっち演算子)はレシーバーであるオブジェクトに対してあるメソッドを実行した時、そのオブジェクトがnilの場合、nilを返すことでエラーを出さなくする
>>  user&.authenticate(params[:session][:password])
=> nil
visit about page aboutページへいくとエラーになる
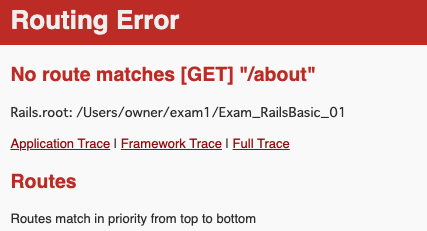
ルーティングエラーなのでrails routesで調べると
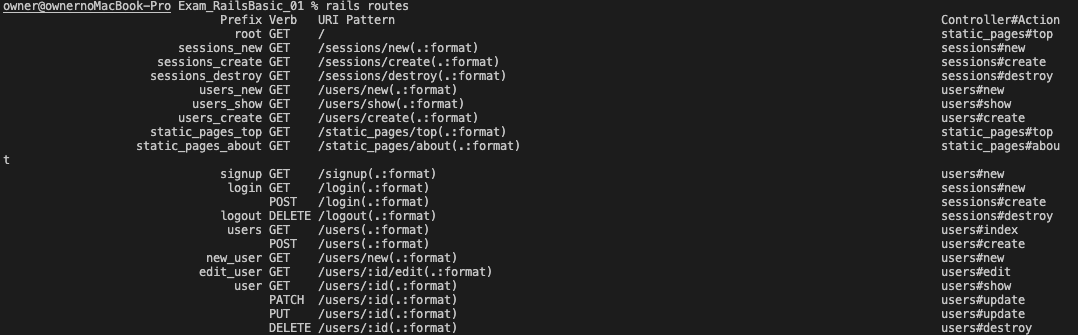
static_pages_about GET /static_pages/about(.:format)
static_pages#aboutが間違っている。
localhost:3000/static_pages/aboutへアクセスしてみると
 static_pages_controllerにaboutアクションがないとでるのでstatic_pages_controller.rbにaboutアクションを作る
class StaticPagesController < ApplicationController
  def top; end

  def about; end

end

※中身のないメソッドについて
def about; end

def about
end

def about
render :about
end

これらはすべて同じ書き方でrenderは省略されている。
aboutアクション作成後、再度アクセスするとaboutアクションはあるがそれに対応するテンプレートがないとでた。
 viewsを調べたらファイル形式が違っていて認識されていないことがわかった。
owner@ownernoMacBook-Pro Exam_RailsBasic_01 % ls app/views/static_pages
about.rb        top.html.erb
about.rb→about.html.erbに修正。
あとはlocalhost:3000/static_pages/aboutからlocalhost:3000/aboutへルーティングを変更するだけ get 'static_pages/about’からget '/about', to: 'static_pages#about'へ変更
テストが通ることを確認。
Rspec実行時におけるエラー
エラー内容
system specを用いて新規作成機能のコードをテストした際、
「Failure/Error: fill_in '名称', with: task_name」と
「Capybara::ElementNotFound: Unable to find field "タイトル"」エラーがでた。
エラー画面
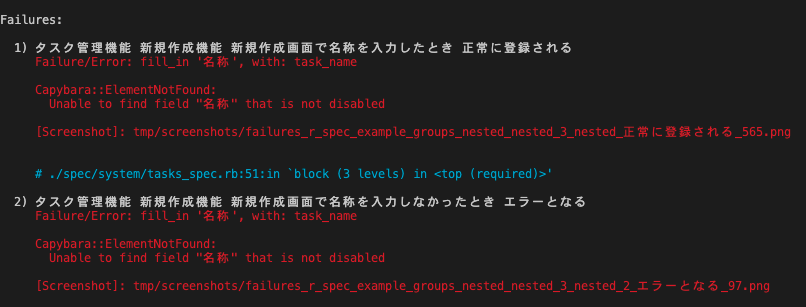
「名称」は無効になっているので使用することはできないということから、テストコードに書かれているfieldの名称が異なっていることがわかる。
エラー解決手順
①chromeのデベロッパーツールを使用しfieldの名称を確かめる。
検証画像
 テストするタスク新規登録画面のフォーム入力のところにカーソルを近づけ調べるとfill_inのname属性と異なっていることがわかった。’名称’ではなく、'task[name]'であった。
fill_inについて
fill_inはフォーム入力を行うことができる「fill_in 'フォーム名' , with: フォームへ入力する文字列」と記述する。フォーム名にはname属性を記述される。
②name属性が違っていたので、テストコードを正しい記述へ変更する。
変更前のテストコード
describe '新規作成機能' do
    let(:login_user) { user_a }

    before do
      visit new_task_path
      fill_in '名称', with: task_name</span>
      click_button '登録する'
    end

    context '新規作成画面で名称を入力したとき' do
      let(:task_name) { '新規作成のテストを書く' }
      it '正常に登録される' do
        expect(page).to have_selector '.alert-success', text: '新規作成のテストを書く'
      end
    end

    context '新規作成画面で名称を入力しなかったとき' do
      let(:task_name) { '' }

      it 'エラーとなる' do
        within '#error_explanation' do
          expect(page).to have_content '名称を入力してください'</span>
        end
      end
    end
  end
変更後
describe '新規作成機能' do
    let(:login_user) { user_a }

    before do
      visit new_task_path
      fill_in 'task[name]', with: task_name
      click_button '登録する'
    end

    context '新規作成画面で名称を入力したとき' do
      let(:task_name) { '新規作成のテストを書く' }
      it '正常に登録される' do
        expect(page).to have_selector '.alert-success', text: '新規作成のテストを書く'
      end
    end

    context '新規作成画面で名称を入力しなかったとき' do
      let(:task_name) { '' }

      it 'エラーとなる' do
        within '#error_explanation' do
          expect(page).to have_content 'Nameを入力してください'
        end
      end
    end
  end
再度テストを実行し確認。
 無事にエラーが解決。
追記
bundle exec rspecについて
Rspecには表示を詳細に出力する--format documentationというものがある。上記画像のテストコードは-fdオプションで実行している。
-fdオプションの使い方
テスト実行時に以下のように指定
$ bundle exec rspec -fd
または、.rspecに下記の記述を追加する。
--format documentation
どのように表示が変わるか
通常時 bundle exec rspec では . で表示される。
$ bundle exec rspec spec/system/tasks_spec.rb
2021-04-06 04:42:19 WARN Selenium [DEPRECATION] Selenium::WebDriver::Chrome#driver_path= is deprecated. Use Selenium::WebDriver::Chrome::Service#driver_path= instead.
Capybara starting Puma...
* Version 3.12.6 , codename: Llamas in Pajamas
* Min threads: 0, max threads: 4
* Listening on tcp://127.0.0.1:61777
.....

Finished in 3.44 seconds (files took 1.82 seconds to load)
5 examples, 0 failures
-fdオプションを指定するとテストコードのcontextとitを表示してくれる。
$ bundle exec rspec -f d  spec/system/tasks_spec.rb
2021-04-06 04:07:10 WARN Selenium [DEPRECATION] Selenium::WebDriver::Chrome#driver_path= is deprecated. Use Selenium::WebDriver::Chrome::Service#driver_path= instead.

タスク管理機能
  一覧表示機能
    ユーザーAがログインしているとき
      behaves like ユーザーAが作成したタスクが表示される
Capybara starting Puma...
* Version 3.12.6 , codename: Llamas in Pajamas
* Min threads: 0, max threads: 4
* Listening on tcp://127.0.0.1:53137
        is expected to have text "最初のタスク"
    ユーザーBがログインしているとき
      ユーザーAが作成したタスクが表示されない
  詳細表示機能
    ユーザーAがログインしているとき
      behaves like ユーザーAが作成したタスクが表示される
        is expected to have text "最初のタスク"
  新規作成機能
    新規作成画面で名称を入力したとき
      正常に登録される
    新規作成画面で名称を入力しなかったとき
      エラーとなる

Finished in 3.52 seconds (files took 1.8 seconds to load)
5 examples, 0 failures
ActiveRecordエラー
ActiveRecord::StatementInvalid
SQLite3::SQLException: no such column: tasks.user_id:
error文に書いてあるとおりtasksテーブルにuser_idカラムがないというエラーである。 データベース上でUserとTaskを紐付ける際に発生した。 まず、ジェネレータでマイグレーションを作成し、
$rails g migration AddUserIdToTasks
マイグレーションファイルを以下のように編集しマイグレーションを実行した。
class AddUserIdToTasks < ActiveRecord::Migration[5.2]
  def up
    execute 'DELETE FROM tasks;'
    add_reference :tasks, :user, null: false, index: true
  end

  def down
    remove_reference :tasks, :user, index: true
  end
end

$bin/rails db:migrate
データベースの状態を確認したところ、マイグレーションを実行したにもかかわらず、データベースにuser_idカラムはつくられていないことがわかった。
#データベースへ接続
$rails db
=>SQLite version 3.28.0 2019-04-15 14:49:49
Enter ".help" for usage hints.
#データベースの一覧を確認
sqlite>.database
#テーブル一覧を取得
sqlite>.tables
ar_internal_metadata  tasks
schema_migrations     users
#テーブルの中のカラムを確認(今回はtasksテーブル)
sqlite> PRAGMA TABLE_INFO(tasks);
0|id|integer|1||1
1|name|varchar|1||0
2|description|text|0|NULL|0
3|created_at|datetime|1||0
4|updated_at|datetime|1||0
sqlite> .exit
結論
ジェネレータの書き方が間違っていた。マイグレーションファイルにchangeメソッドがなかった。書籍では、bin/rails g migration AddUserIdToTasksで実行しているが、 「rails g migration Addカラム名Toテーブル名 カラム名:カラムのデータ型」このように、カラム名とカラムのデータ型を追加したら Tasksテーブルにuser_idカラムを追加することができた。マイグレーションをやり直すために、最初に作成したファイルを削除する必要がある。
#まず、ステータスを確認する。
$rails db:migrate:status
 Status   Migration ID    Migration Name
--------------------------------------------------
   up     20210323195016  Create tasks
   up     20210329092418  Change tasks name not null
   up     20210329175420  Create users
   up     20210329190039  Add admin to users
  down    20210331174646  Add user id to tasks

#upの場合、「$bin/rails db:migrate:down VERSION=migration_file_id」を実行し、downにする。
#downは、まだデータベースへ反映されていないので、削除しても問題ない。削除を実行。
$rm db/migrate/20210331174646_add_user_id_to_tasks.rb

#削除できたかステータスを確認。
$rails db:migrate:status
 Status   Migration ID    Migration Name
--------------------------------------------------
   up     20210323195016  Create tasks
   up     20210329092418  Change tasks name not null
   up     20210329175420  Create users
   up     20210329190039  Add admin to users
削除が確認できたらマイグレーションを「rails g migration Addカラム名Toテーブル名 カラム名:カラムのデータ型」で作成。
$bin/rails g migration AddUserIdToTasks user_id:integer
Running via Spring preloader in process 65692
      invoke  active_record
      create    db/migrate/20210401072016_add_user_id_to_tasks.rb
マイグレーションファイルを以下のように編集し、マイグレーションを実行。 マイグレーションファイルでは、changeメソッドの中でテーブルが作成される。
class AddUserIdToTasks < ActiveRecord::Migration[5.2]
  def change
    add_column :tasks, :user_id, :integer
  end

  def up
    execute 'DELETE FROM tasks;'
    add_reference :tasks, :user, null: false, index: true
  end

  def down
    remove_reference :tasks, :user, index: true
  end
end

$bin/rails db:migrate
== 20210401072016 AddUserIdToTasks: migrating =================================
-- add_column(:tasks, :user_id, :integer)
   -> 0.0010s
== 20210401072016 AddUserIdToTasks: migrated (0.0011s) ========================

#ステータスを確認
$bin/rails db:migrate:status
 Status   Migration ID    Migration Name
--------------------------------------------------
   up     20210323195016  Create tasks
   up     20210329092418  Change tasks name not null
   up     20210329175420  Create users
   up     20210329190039  Add admin to users
   up     20210401072016  Add user id to tasks
user_idカラムが作成されているかデータベースを確認。
$rails db
SQLite version 3.28.0 2019-04-15 14:49:49
Enter ".help" for usage hints.

sqlite> .databases
sqlite> .tables
ar_internal_metadata  tasks
schema_migrations     users

sqlite> PRAGMA TABLE_INFO(tasks);
0|id|integer|1||1
1|name|varchar|1||0
2|description|text|0|NULL|0
3|created_at|datetime|1||0
4|updated_at|datetime|1||0
5|user_id|integer|0||0

sqlite> .exit
無事にuser_idカラムが作成され、解決。